New work on display .

2-20140817_200853Come and check out some of my handy work in the Extra section , I currently show most of the steps in making a pair of 14k Gold spinning earring out of the material in the picture above.. Hopefully you will enjoy it as much as I had making them..

New designs: Bangles, Lone Mountain & #8 Turquoise Bracelets

Reciently I have designed a few new items to take to the Winter Market and now these unique items are currently in my shop and available for purchase.. Domestic USPS  Priority shipping is free on all purchase’s, Order in time to recieve that special item in time for Christmas..

Double Bangles:

Elegant and sophisticated Double Bangles.  Hand fabricated Sterling Silver Bangles, embellished with 18k Gold Bezel and 2MM VS/G diamonds, bead blasted to give the look a satin finished.  The look offers a contemporary flare and is sure to complete any ensemble. Bangles are available in S/M/L.

Lone Mountain Bracelet:

Lone Mountain Turquoise, rich in color and noted for its ability not to fade, makes this cuff a spectacular addition to any turquoise jewelry collection. Made of 14 gauge Sterling Silver, this offset Lone Mountain bracelet unifies the cross hatch texture of the cuff with 18k Gold Bezel to enhance the beauty of the Lone Mountain Turquoise. This bracelet is sure to provide a traditional look with contemporary elements.

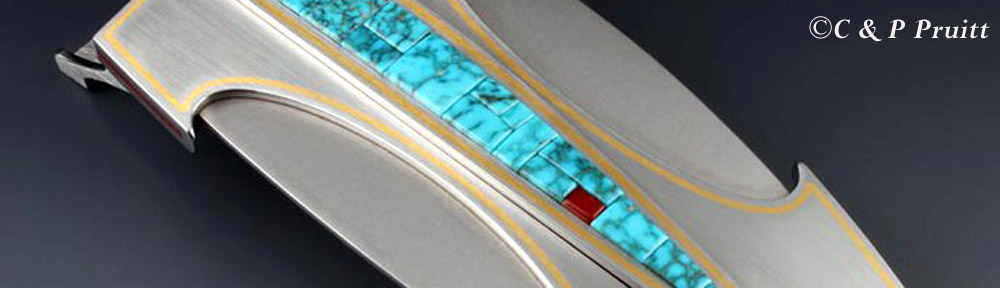
#8 Turquoise Bracelet:

#8 Turquoise noted for its golden brown to black distinctive spider web matrix and unique bright powder blue and green background make this bracelet a valuable addition to any jewelry collection. Hand fabricated 14 gauge Sterling Silver cast cuff, adorned with offset 18k Gold bezel provide the perfect foundation to enhance the beauty of the #8 Turquoise. This bracelet is sure provide a traditional look with contemporary elements.

Contemporary Inlay Buckle..


Here is one of my latest creations. A Contemporary Belt buckle consisting of sterling silver, Black Jade and Coral. The  “Spyderweb” texture on the silver is unique, all components of the buckle are hand fabricated and asselmbeled by myself. Texturing is done by placing a patterning medium ( canvas, screen, manila folder etc.) with a piece of annealed silver and putting it through a rolling mill, transferring the pattern onto the metal. Brighter results are achieved by pre polishing the silver prior to rolling.

It is currently for sale in the Shop Buckles Section with further information and extra pictures.


Cpruitt


Repousse: Making tools and my first attempt..

  While  researching different types of smithing and applications. I found that Repousse is an interesting technique dating from Antiquity. An age-old metalworking technique where a malleable metal (gold, silver, copper, tin and bronze) is hammered from the back to create an ornate design. Also accompanying Repousse is Chasing,  Chasing works from the top side by sinking the metal to create the desired effect.  Astonished with the creations of  forms, raised design and sunken relief, I Inquired about it a little more.. I came upon Victoria Lansford’s work, displaying her technique on High Relief Eastern Repousse.  Who offers her modern-day approach to the age-old technique.. As well as an article on Ganoksin  website, going into detail about techniques, tools and application.  
   Being the diverse artist that I am, I thought I would give it try “What do I have to lose”. I decided to make some of  the basic tools on  my own. For the pitch bowl: It was a salsa container purchased from Wal-Mart. Placing a piece of lead at the bottom and filling it  2/3 with quick dry cement, until it sets. Then I removed the legs on the salsa bowl giving it a round bottom. Filling the remaining area with Green pitch from Rio Grande. If utilizing the bowl with a sand bag, you can achieve a wider radius of working angles. With a little help of my brother Pat’s toys, I was able to make the basic tools out of tool steel, nail punches and ruined stamps. This was achieved by cutting, sanding, filing, polishing and flame hardening the tools.
  “Now  I’m ready to play”  Working with my hammer, punches/tools, steel block, chasing bowl and base (sand bag). I began to work out my designs on paper, then transferring then onto the silver (annealed) with a magic marker. Using a liner tool I chase the design into the silver, on top of a steel block. In order to show the design on the back. Placing the silver onto the chasing bowl (top side down) with a little heat it will stick to the pitch. Now Im are ready to start hammering out the designs. This will be done in several process, as the metal will work harden and need to be annealed again and again. 
 In the pictures are my first attempts at creating a pair of earrings utilizing the Repousee technique.  Dabbling for 20 min at a time, it has taken me 3 to 4 hours to get this far (just on the Repousse) Still not finished with the earrings I decided to share my experience so far with you.

Cpruitt

Further info on the following :
       Repousse and Chasing @ Wikipedia the free encyclopedia.
       Chasing and Repousse @ Ganoksin
       Victoria Lansford – High Relief Eastern Repousse
      

Black Jade and Diamond Cuff

Recently I took some time off to have my tonsils removed. Which allowed me to relax and take things slow. After recovering I made my way back into the studio. Things were slow to start, but my time away has brought up some new ideas. Here is one such design that has come to light . I still haven’t come up with a name for it yet, so in the time being  it will be ” Black Jade and Diamond cuff “. It started almost 13 months ago, when I was working on a cabochon of black jade, natural Royston turquoise and coral. Spending only a few hours to cut, slab and polish these stones to create the interesting cabochon above. It sat on my desk staring me down and wondering where it would lead too next.. As time passed it was shuffled from place to place, until last week. I began to work on a silver cuff, texturing, forming, sanding and polishing the piece. When I remembered one of my recent sketches, that incorporated a cabochon of similar shape and design. The decision was made, I would combine the two. I started on the setting for the cabochon and braised it onto the new silver cuff slightly risen and off center. This design element took advantage of the rule of thirds (which I use in a majority of my work), thought to me by another great artist, teacher and friend Mrs. Jean Thurow. Next I created the seating for the 6 diamonds (2mm, 0.24 tcw) and set them into the cuff. The final stage would be to set the cabochon, this would be done by chasing the silver bezel around the stone. After one last polish and cleaning all the elements had fallen into place. At last,  It was complete.

Thank you to everyone who assisted in my recovery and all who wished me well and a speedy recovery.